
Left, drilling the tree is the first step.
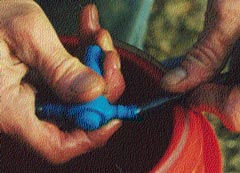
Above, plastic tubing is pressed onto a tap. It is dipped into hot water in the orange bucket to make it pliable.
Photos by Char Sweet
Last Update: 3 March 2013
I have added a short movie about our sugar operation shot in February 2012. It is in Flash Video format (10 MB) and should work fine with any DSL or faster connection. I would not try it on dial-up. It is low resolution (to keep the file size in hand) so it is not real sharp but may be interesting.
In the past most farms in this area made sugar in the spring. Now there are five large commercial producers and only a handful of private operations. Methods range from a few gallons boiled in an iron kettle over a wood fire in the backyard up to sophisticated operations with thousands of trees, vacuum systems, and reverse-osmosis concentrators. Our setup is in between but much closer to the kettle. The basic operation is very simple and is the same for everyone. Water that contains about one to three percent sugar is drawn from maple trees and then concentrated, mostly by boiling, until syrup that is about two-thirds sugar is left.
|
|
|
Left, drilling the tree is the first step. Photos by Char Sweet |
|
The first step in all cases is to drill a hole in a tree and drive in a tap. The first photo, above, shows the hole being drilled at a slightly up angle and about 2.5" deep. The type of tap used depends on the system employed. The traditional method uses metal taps and a bucket is hung on each one. Most operations now use plastic tubing and the second photo shows the tube being put onto a tap. The photo at right shows the tap being driven into a hole on the opposite side of the tree from the hole being drilled in the picture above. Our trees receive one to three taps depending on their size; this one gets two. The tubes from these two taps are joined together and go off to join others before reaching the sugar house. |

Photo by Char Sweet |
We use two methods of collecting the water from the trees. Both start with tubing. Five of our trees, on a hill above the sugar house, are all connected together and the water is collected in a large reservoir from which it can flow directly to the evaporator. The output from a dozen other trees, singly or in pairs, flows into jugs, which we pick up and carry to the evaporator.
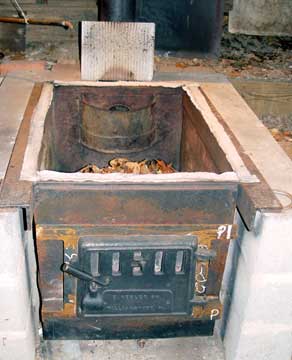
We got a new stove a couple of years ago and improved it a bit more for 2007. Here it is set up with the fiberglass sealing strips, ready to receive the pan. The curved structure at the rear forces the flames up against the pan and slows the exit of combustion gases into the flue. |
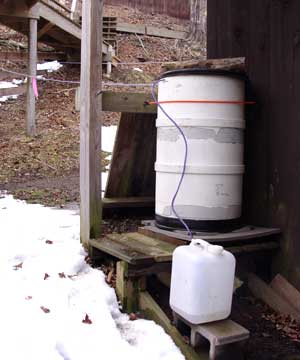
The barrel is set up just outside the shed to receive water from the main line. The five-gallon jug is an overflow reservoir, in case inflow exceeds the evaportion rate. |
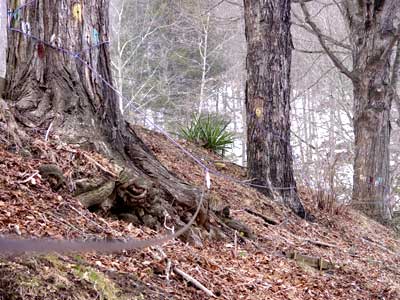
The mainline tubing comes down from several trees on the hill behind the shed and flows into the barrel. Here we can see three of the five trees that feed this line. The paint marks on the trees show where taps have been placed in past years. It is essential to drill in a new spot each year. |
|
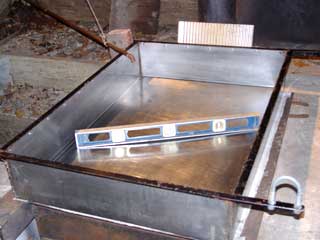
It is necessary for the pan to be level so that the syrup maintains a uniform depth as it boils down to the finishing point. |
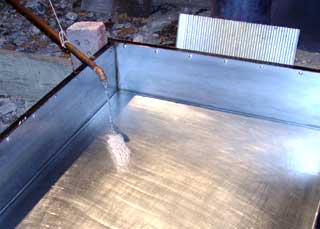
The barrel is fitted with a drain pipe and valve. Here water is flowing in from the barrel. It is perfectly clear at the beginning and darkens slowly as it concentrates. |
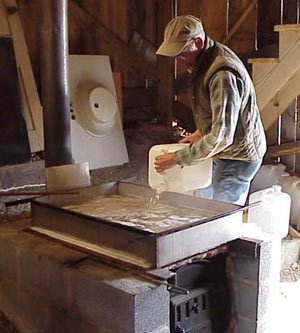
Water from one of the jugs is poured into the evaporator pan. These two photos were taken in 2001 and show the old stove, which was made from a 55-gallon drum. |
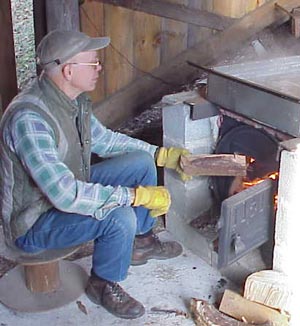
The fire needs to be stoked every 30 minutes to an hour. The new stove has a larger firebox and is also more efficient. It can go two hours or more between stokings. Photos by David Allen |
The evaporator is a 2' x 3' stainless-steel pan supported on a concrete-block structure over a wood fire. This year [2001] we are literally burning our old cabin to make syrup. Instead of taking it to the dump or burning it in a big pile, we actually cut up most of the scrap wood for the sugar fires! To go from sugar-water out of the tree to finished syrup requires the removal of prodigious amounts of water. The “Rule of 86” applies, which says that the number of gallons needed to make one gallon of syrup is equal to 86 divided by the percentage of sugar in the water. Since typical trees yield about 2% sugar, this means that about 43 gallons must be boiled down to make one gallon of syrup! We can boil off about five gallons per hour with aggressive fire stoking. We are usually a bit more relaxed about it and get off 2½-3 gph. Don’t try this in your kitchen, even to make a quart. You will have steam condensing on the walls, enough of a mess by itself, but the steam will contain traces of sugar so everything will get sticky too.
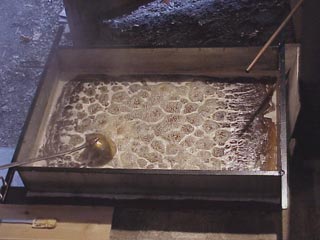
This pan of syrup is nearly finished. The copper tube at upper right feeds water from the reservoir barrel into the pan. |
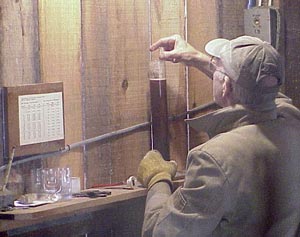
A hydrometer can be used to test the density of the syrup as the finishing point is approached. Photos by Pat Wilson |
As it nears the finish point, the color changes from clear water to amber syrup and the viscosity increases markedly. With experience one can tell by eye and feel when it is ready. To be certain, it is best to test the density with a hydrometer. A sample is dipped from the pan, poured into a tall cylinder, and the hydrometer is floated in it. The first batch of the season I test several times as it progresses to get myself calibrated. After that I can usually hit it pretty well with only an occasional test to stay in tune.
We usually try to stockpile about 80-100 gallons before starting to boil. We boil continuously for two or three days, adding water as we go. The finished batch will have used 100-160 gallons of water and will produce two to four gallons of syrup. When it is finished we lift the pan off the fire and pour the syrup into buckets. Here, our neighbor, David Allen, helps with the pouring while Char is out of town. |
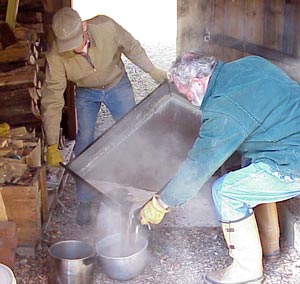
Photo by Pat Wilson |
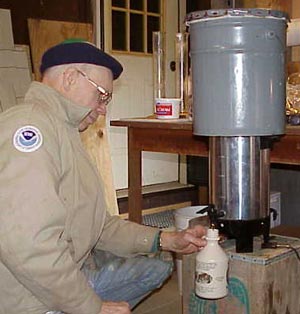
Finished syrup must be filtered to remove “sugar sand,” a natural impurity, and any debris that may have blown into the evaporator. The filter is supported in a five-gallon pail with an open bottom and drains into a large coffee pot. The filter is wool felt in the form of a round-bottom cone and has a paper prefilter liner that is used once and discarded. The buckets of syrup are poured into the filter, kept hot with the heating element in the coffee pot, and drawn off into jugs. The heat sensor in the coffee pot, which shuts it off when the coffee is ready, must be disabled so the heating element can run continuously. We have it plugged into a terminal strip so it can be switched on and off as needed.
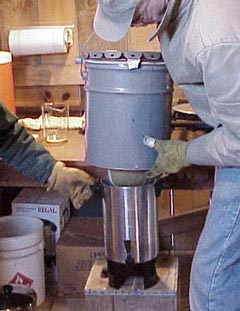
The filter can be seen here protruding from the bottom of the pail as it is set on the coffee pot. Photo by Pat Wilson |
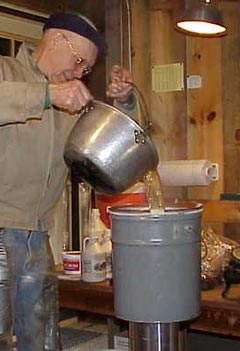
Finished syrup is poured into the filter. Photo by David Allen |
|
Maple season starts with the first warming days of mid-to-late winter and continues until the sap rises in the trees and turns the syrup “buddy.” Here in Virginia we usually open the trees about the first of February and go until mid-March. Highland County celebrates with a Maple Festival every year in March. attracting thousands of visitors to see the sugar camps and eat pancakes and syrup. In Vermont, they may not be starting until after we are finished! Ideal weather is in the 20s at night and 50s by day. This diurnal cycle acts like a pump for the trees, shutting them down at night and increasing the flow by day. Continuous cold weather stops the flow completely, while several warm days without colder nights stops it as well. |
Bottling is the final step, aside from eating, of course! Photo by David Allen |
J R S


|